
Finishing the MLP
- Mischa
- LUT model
Now, that the new computer is completely set up after several waking nights, the completion of the LUT is on the way *ggg*. The performance of the 6core processor and the ATI V8800 are satisfactory, and above all the machine is clearly quieter than its predecessor.

MLP Side 2 & 3
The structural applications on sides 2 and 3 are now finished. The whole thing is about as laborious as getting a crawler stuck in the snow back on track, which is due to the structure of the NASA plans. If you expected a handful of drawings with the headline We're building a launch tower for the moon rocket, you should look for another occupation *ggg*
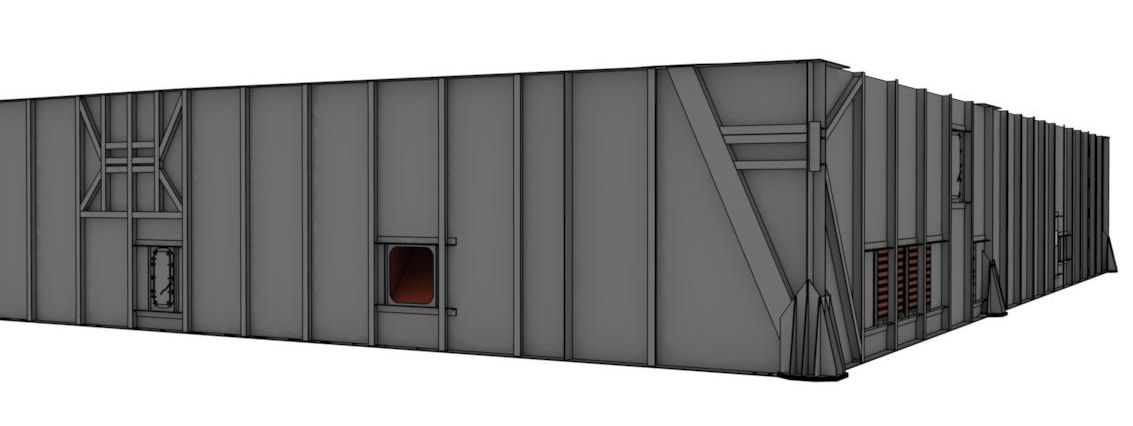
As a small example - to place a door in the right place, you have to study 6 different plans from three different plan collections (about 100-200 individual plans each). The girder structure plan tells you that an opening needs to be milled into the steel; kindly even the distance from the center of the vertical axis of the opening is noted. The Girder Openings Plan then shows more details about basic openings in steel plates - for example, that door openings start 6 inches above ground level.
The room layout specifies what type of door should be there, and the floor plan gives you the final floor height. In the door plan all door types are listed, with definition of the raw and fine openings, door frame and installation instructions. Finally, there is a plan that will give you the static requirements and the dimensions and material for the beams.
MLP Side 3
Once you've got it all together, it's best to study the supplemental file, where last-minute changes are noted, and photos of the real thing, because the chances of getting lost somewhere are endless (the plans are sometimes inside, sometimes outside view, and thus mirrored) - for example, the spider-like web of girders above the entrance door is not in the center, but offset by 8' - and you can quickly get to the wrong side.

Rollout of Apollo 17. Courtesy of NASA.
The red opening is the escape tunnel, which leads directly from the lift room to the outside. It is inclined both horizontally and vertically, and puts your understanding of geometry to the test *ggg*.

Escape tunnel.
Fortunately, the other two sides are a bit easier to design - and then it's time to turn on the printer and raise the prototype to the three-dimensional ;)
.... and because it is so beautiful (and sad):.

The Discovery at the launch pad for her last flight. Courtesy of Ed Griffith, with permission.
Ed sent me brilliant pictures the day before yesterday - they brought the Discovery to the launch pad, to her last flight ...